
Every spring, my wife and I get really excited about all the pretty plants and flowers that we can decorate our yard with. We also generally grow some vegetables and/or herbs. The problem with this is that we live in Georgia in the US and it gets freaking hot and humid here during the summer. The oppressive heat makes us not want to go outside to water the plants. Combine this with a little bit of traveling and you have a recipe for mostly dead plants during the latter part of the growing season. Well, this year we decided to not only acknowledge this reality, but to do something about it. You see, I’m a bit of a home automation nut and my wife knows it. She was shopping on Amazon and came across an inexpensive drip irrigation kit for gardens and decided to buy it for a raised flower bed we were already planning to setup this year. When it came in, she showed it to me and said “now I just need you to make it come on automatically.” As you might be able to guess, I was more than happy to take up that challenge. I spent a couple of days doing research to find a solution that fit within these self-imposed parameters:
- any smart devices must not require internet access
- the solution had to be able to be controlled via Home Assistant
- all parts had to be relatively inexpensive both individually and when combined together
- I must be able to use multiple instances of the setup so that it can be applied to multiple places in the yard
What I came up with was a zigbee-based water valve with a built in timer and a soil moisture sensor that connects up to the weather station I already had. With these two items I can ensure that we only water the plants when they need it. I also got a 3-way manifold to go on my spigot on the side of my house so that I could connect two valves and one regular garden hose.
The picture below shows the irrigation kit and the soil sensor. The larger tubing snaking through the middle is 1/2" diameter. The smaller tubes are 1/4" and connect to the sprinkler heads (the blue-topped things). Each sprinkler has a little spike under it to keep it in place and is adjustable so that you get just the right amount of water out of each one. The bright green thing with a white disk in the center of it is the top of the soil sensor.
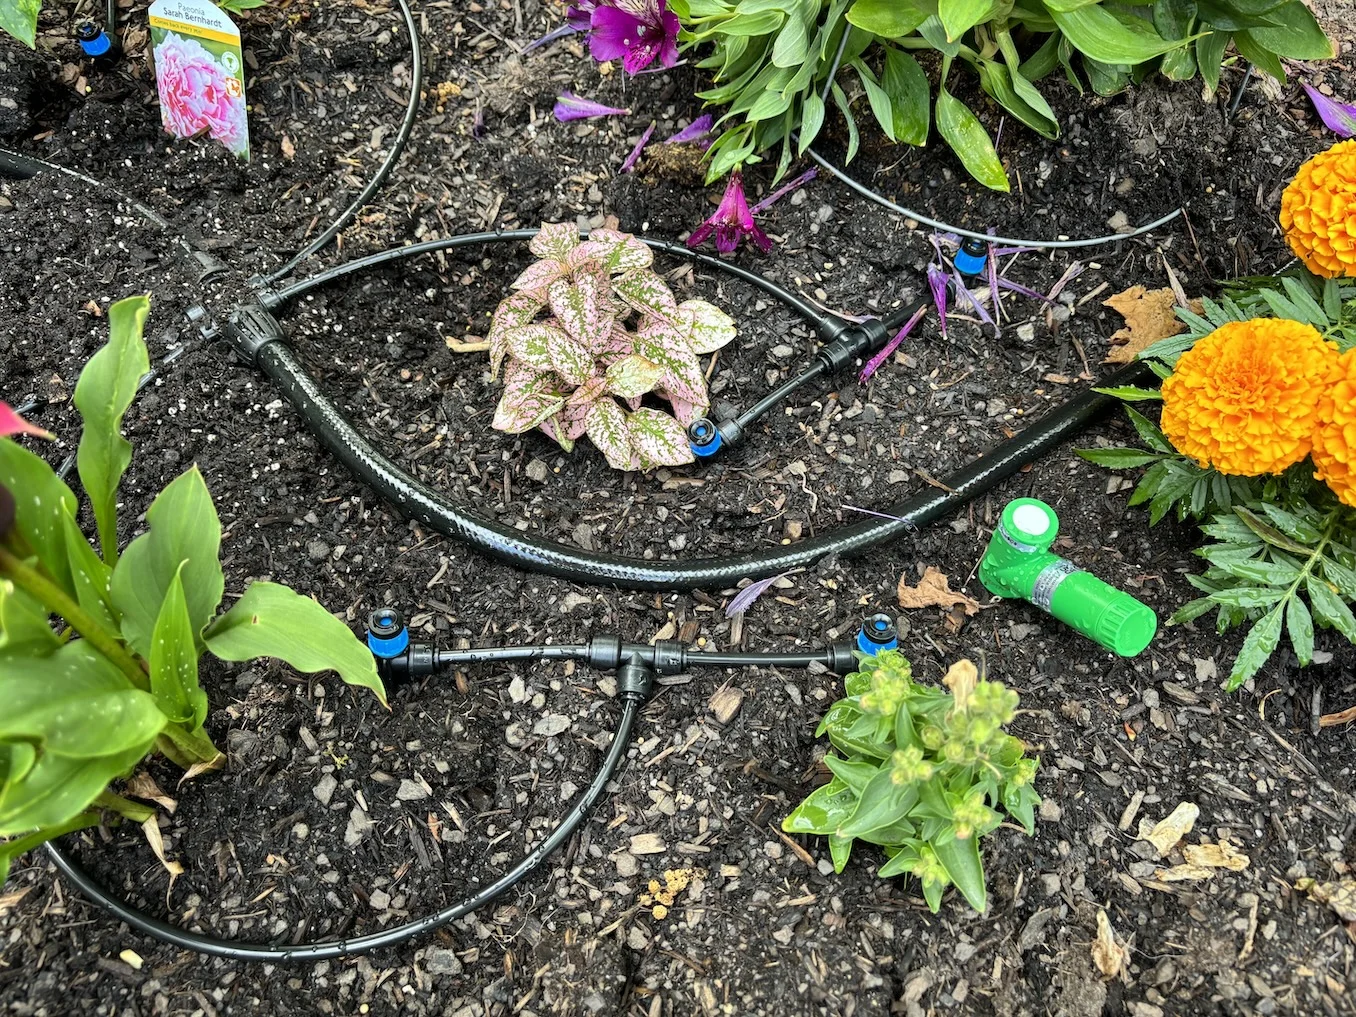
Here is what it looks like with the sprinklers on:

A couple of things to note in the picture above are that the sprinklers each water right near the base of a plant and that the soil sensor gets watered as well.
Parts list
Below are links to each item I used. Many of these are affiliate links so if you happen to buy something I’ll make a few buck by you using the link.
- Carpathen Drip Irrigation Kit for Garden
- I bought two of these and we ended up with parts left over.
- SASWELL Irrigation Timer SAS980SWT-7-Z01
- This is, like so many devices on Amazon, made by Tuya. The zigbee connectivity works just fine with Home Assistant’s Zigbee Home Automation (ZHA) as does the on/off functionality. The other niceities, unfortunately, don’t work. Still, on/off is all that is needed for this project and does not require the use of the Tuya zigbee gateway that comes with the device.
- As a bonus, the kit comes with a quick disconnect coupler that can connect to the bottom of the time or to a hose and the other end goes on 1/2" drip tubing. Of the three different fittings I tried, this is the easiest to use and the only one that didn’t leak.
- Orbit 62009 3-Way Plastic Hose Faucet Valve Manifold
- This one had great reviews and seems to work really well. As a matter of fact, it had much better reviews than the brass ones. In addition to the three connections along the bottom that can be turned on and off individually, the left and right end caps also come off and can be used.
- Dixon Valve TTB75 PTFE Industrial Sealant Tape
- The other name for this is “Teflon Tape” - I used it on each of the fittings to make sure leaks are avoided.
- ECOWITT WH51 Soil Moisture Sensor
- I have this connected to my Ecowitt GW2000 Wi-Fi IoT Hub that came with my ECOWITT Wittboy Weather Station GW2001.
- The entire kit works perfectly with Home Assistant 100% locally.
- It also supports up to 8 of the soil moisture sensors.
- HOUYA U Shaped Garden Stakes 4 Inch 40 Pack Drip Irrigation Stakes Galvanized Landscape Garden Staples
- We got these to hold the hoses in place between the timers and sprinklers.
- Utility Hose 5/8 in. x 15 ft. Light Duty (from Home Depot)
- I am using one of these to go between each timer and sprinkler kit.
Assembly
The key to making all these parts into a solution that doesn’t require me to manually turn the water on or off is Home Assistant. Before we get to the automation part though, below is how I put those parts together and integrated them into my Home Assistant.
Step 0: Home Assistant
If you are reading this and don’t yet have Home Assistant then I suggest checking out Home Assistant Green - here is how they describe it:
Ready. Set. Go. — The affordable Home Assistant Green is the easiest way you can start using Home Assistant. It’s plug-and-play and comes with Home Assistant already installed.
I got one for my parents and it is quite nice and really affordable. If you are in the US, I suggest buying from CloudFree if they have it in stock. It’s a small business that I have bought from several times and really like.
Step 1: Weather Station & Soil Sensor
For me, step 1 happened back when I got the Ecowitt GW2001 Wittboy Weather Station as a gift. I have it connected via the Ecowitt integration. I do not use Ecowitt’s cloud at all. Under “Weather Services” in the Ecowitt’s configuration interface, I use the “Customized” to send data to Home Assistant. I also choose to send my station’s data to Wunderground, which I was able to configure on the same page.
When I got the Ecowitt WH51 Soil Moisture Sensor, I put a battery in each one and it connected right up to my station. For my own sanity, I went into both Echowitt’s interface and Home Assistant’s and renamed the sensor immediately after connecting before adding the second one.
Step 2: A Zigbee Network
Step 2’s prerequisite was me already having the Zigbee Home Automation integration setup. Personally, I use a PoE Zigbee coordinator from https://tubeszb.com/ - I am on my second one (I messed up the first one, no fault of the device) and have recommended them to everyone I know. They are really really good and provide a much more reliable setup than any of the USB based coordinators.
I also use Sengled Smart Plugs to ensure I have a very reliable Zigbee network all around my house. I have two such plugs on the side of the house that has the spigot on the outside.
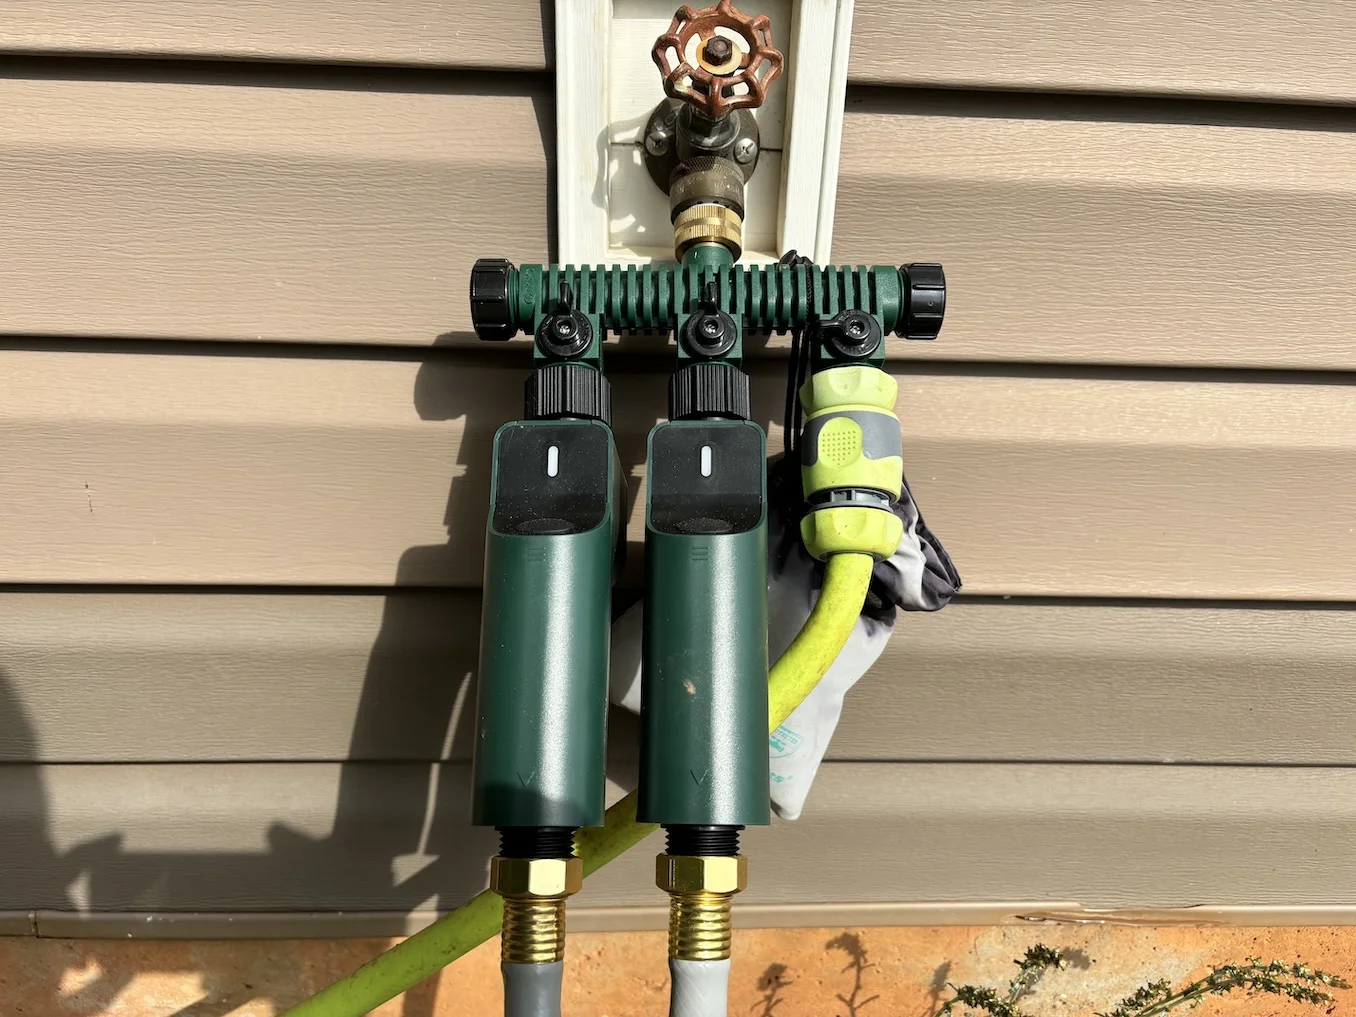
Step 3: The Spigot and Manifold
Step 3 was to take the manifold outside along with the teflon tape and connect it to my spigot. I used a set of pliers opened up wide to get a good and tight seal between the spigot and manifold after wrapping some tape around the spigot’s threads.
Step 4: Water Timers / Valves, Hose, & Stakes
I took each Timer outside one at a time and put batteries in them. I then held the button down to start pairing and each showed up right away in ZHA. Once each was connected, I screwed it onto the manifold. I then turned the spigot on and made sure I didn’t have any leaks.
I then attached a 15’ long 5/8" light duty utility hose from Home Depot to each. I ran each hose to the bed that would be watered and then used the U shaped garden stakes to keep the hose where I put it.
Step 5: Sprinklers
This all started with my wife finding the Carpathen Drip Irrigation Kits, and assembly ends with putting it to use. I attached the quick disconnect fittings from the timer kit to the utility hose and the 1/2 drip hose after applying some teflon tape. She and I then worked together to lay out the 1/2" hose and then to route all the 1/4" hoses from the junction blocks to sprinklers or to T’s that then have a pair of sprinklers attached. This part is doable solo, but was much easier with a second set of hands. One thing we learned the hard way was that we needed something that would easily cut through the hoses… if you don’t already have something for this, maybe order a hose cutter from Amazon with your other parts or grab one from a local auto parts store.
Step 6: Test Flow and Adjust Sprinklers
Last, but not least in this section was to go and turn the timer on by pressing the button on it. Once water stats flowing you can adjust each sprinkler by loosening or tightening the top of it and/or repositioning it. When finished, turn the water back off.
Note: the timer seems to have a built in turn off function after roughly 10 minutes of being on. This surprised me the first time it turned off, so I thought I’d share.
Automation with Home Assistant
Update 2024-06-29

I have now created a Blueprint that makes it easy to use the automations described below. I have one instance of the blueprint associated with each flower bed. The blueprint also allows you to account for needing to water each bed separately as I have found that there isn’t enough water volume when watering them at the same time. This is accomplished via the Pre-actions section of the blueprint like shown here:
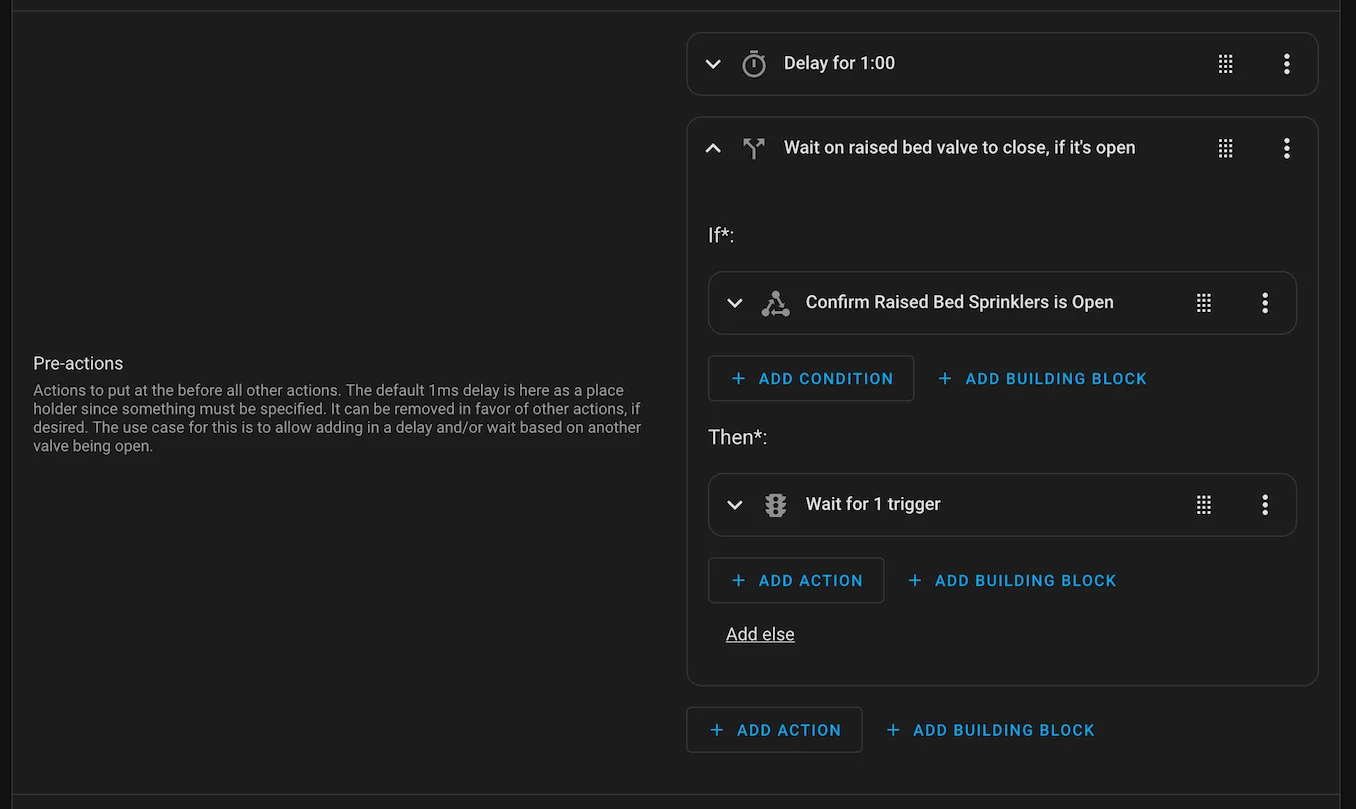
The screenshot shows a 1 minute delay as the first part of the pre-action. This is to give the other instance of the blueprint time to start running. The other instance has similar valve checks for the dahlia bed, but no delay. That one will water first and then this one will water when its finished. If I add a third valve, I may have to change the logic here. On the plus side, you can put any logic you want in this section.
Original Automation Information
We are still tweaking the exact watering frequency and durations, but the automations I setup should work for just about anyone. Here’s the overview of my Home Assistant automation:
The Triggers
Here are the two things that will trigger the automation:
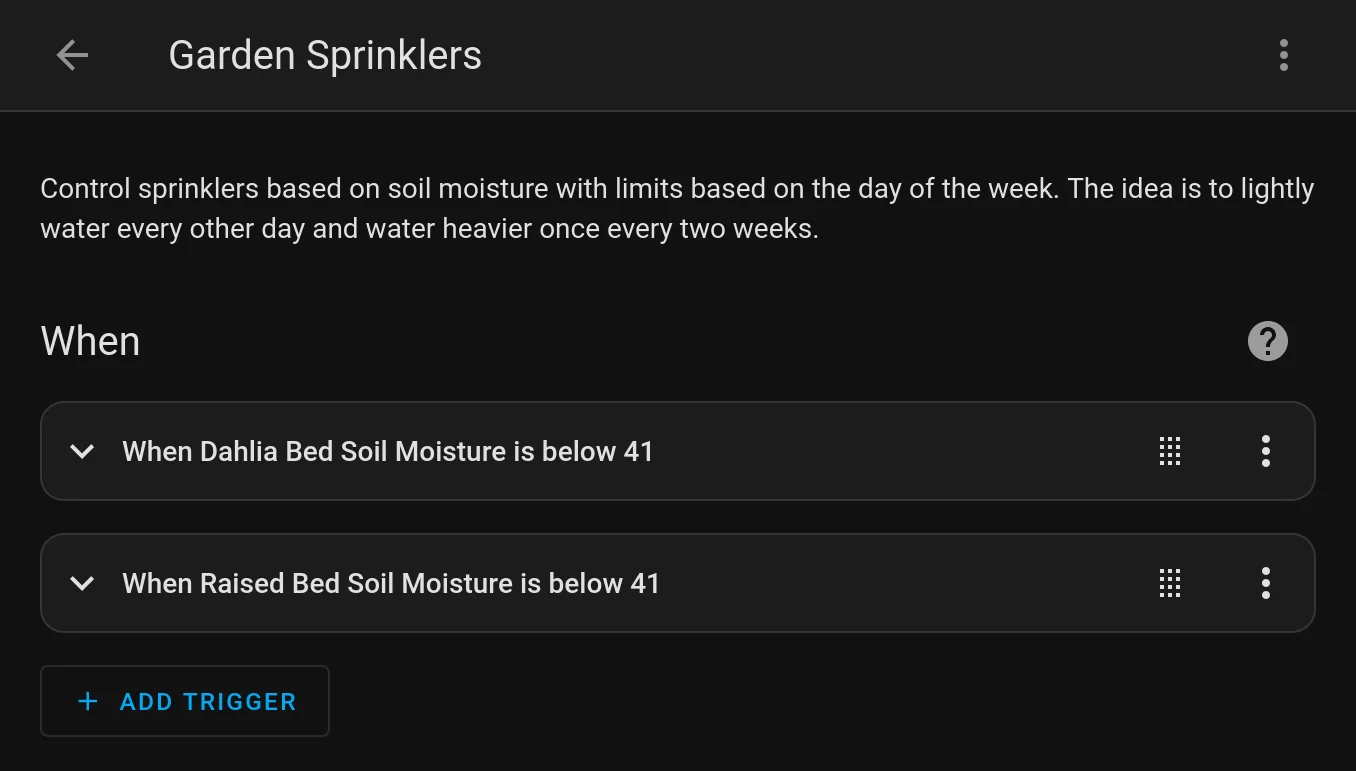
The “41” is a soil moisture reading of 41%. In each trigger I have set an ID so I can reference it in the actions later.
The Conditions
These are the guard rails I have put in to control when the watering happens:
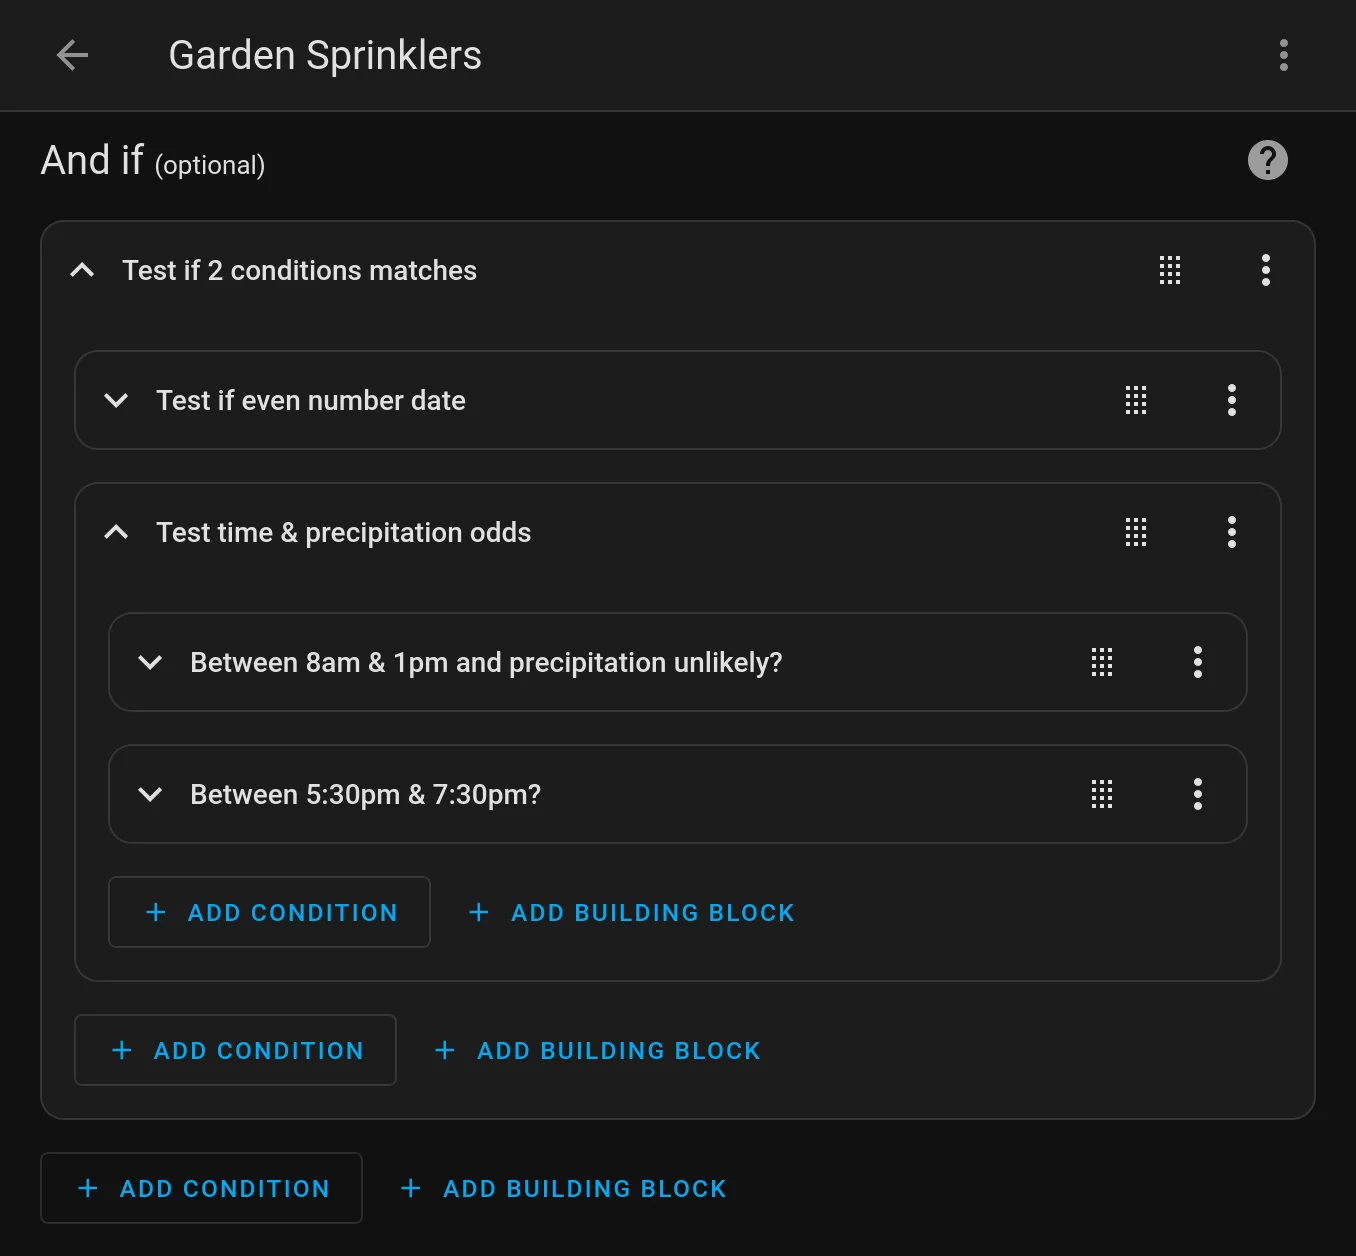
The first condition check to see if the date is an even number. This makes it only water, at most, every other day.
The second condition has two parts, only one of which has to be true.
- The first part checks if it is between 8am and 1pm. This is after everyone is out of bed and before the heat of the day. It also checks to see if a helper I have setup, and will describe shortly, says it is likely to rain or not.
- The second part simply checks it it is between 5:30pm and 7:30pm. This is after the heat of the day and before our kid goes to bed. It does not check the likelihood of rain as the forecast may or may not be right and if it hasn’t rained by 5:30pm then I am fine with doing the watering.
The Actions
If the conditions pass, here is what actually gets done:
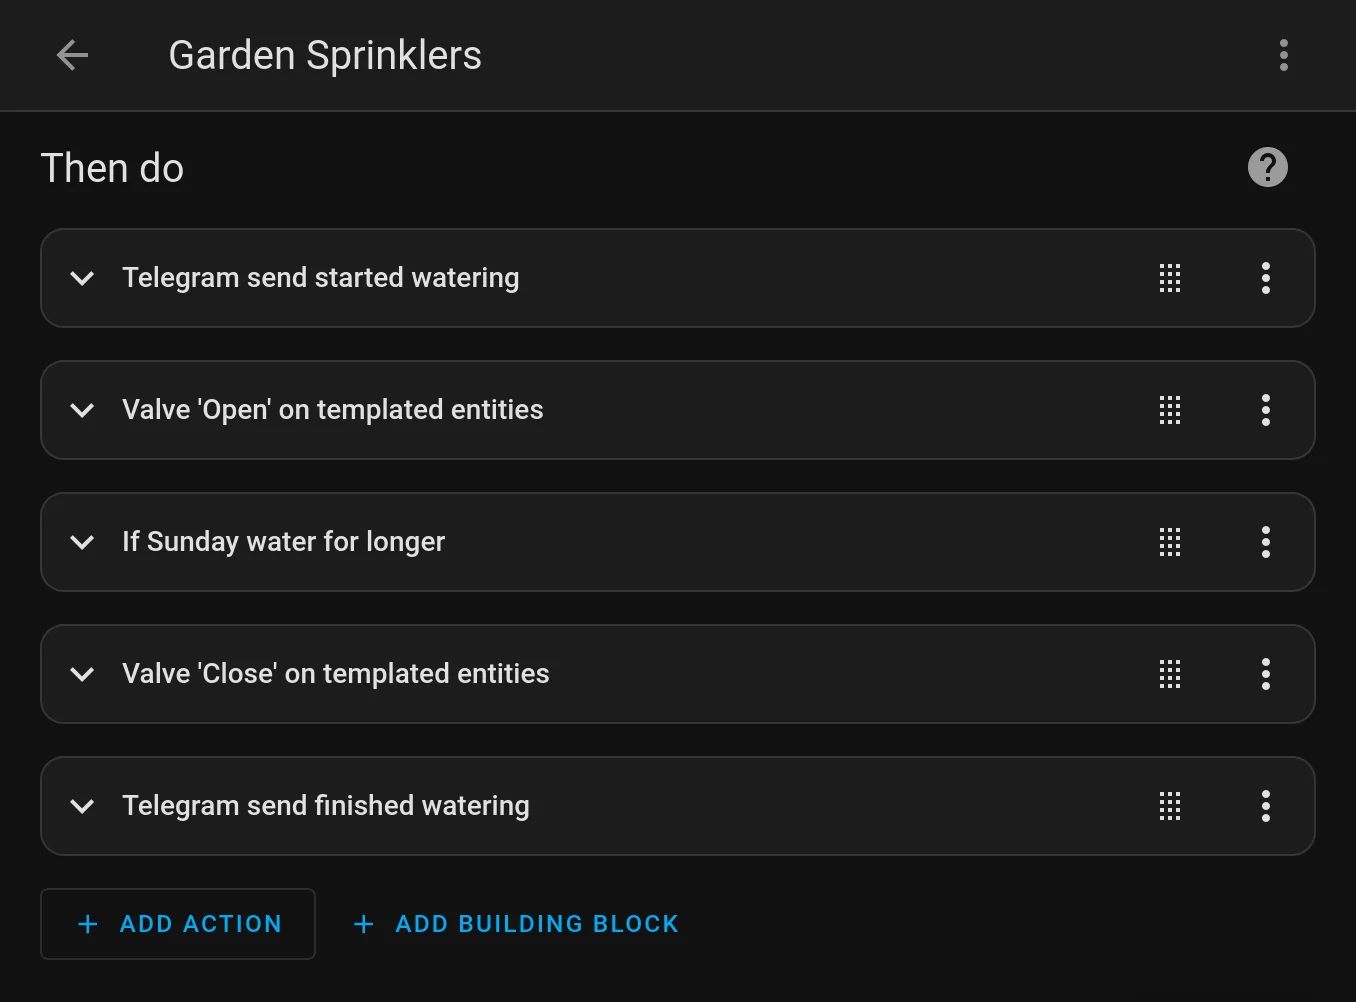
The first part sends me a message in Telegram with the name of the bed that is about to be watered. The ID from earlier is how it knows which one to tell me about.
The second part uses the ID from earlier to turn on the sprinkler of the same name.
The third part tells it to wait for 8 minutes on Sundays, which will happen roughly every other week, or for 2 minutes every other day. This makes it so that it is a good soaking once every 2 weeks and a light watering the rest of the time.
The fourth part turns off the sprinkler.
The fifth part sends me a notification again that tells me the watering has ended.
Supplemental Automation
Since my watering is time-boxed, I needed a way to make the sensor readings from the soil sensors update during that time window. What I came up with was simply triggering a reload of the Ecowitt integration:
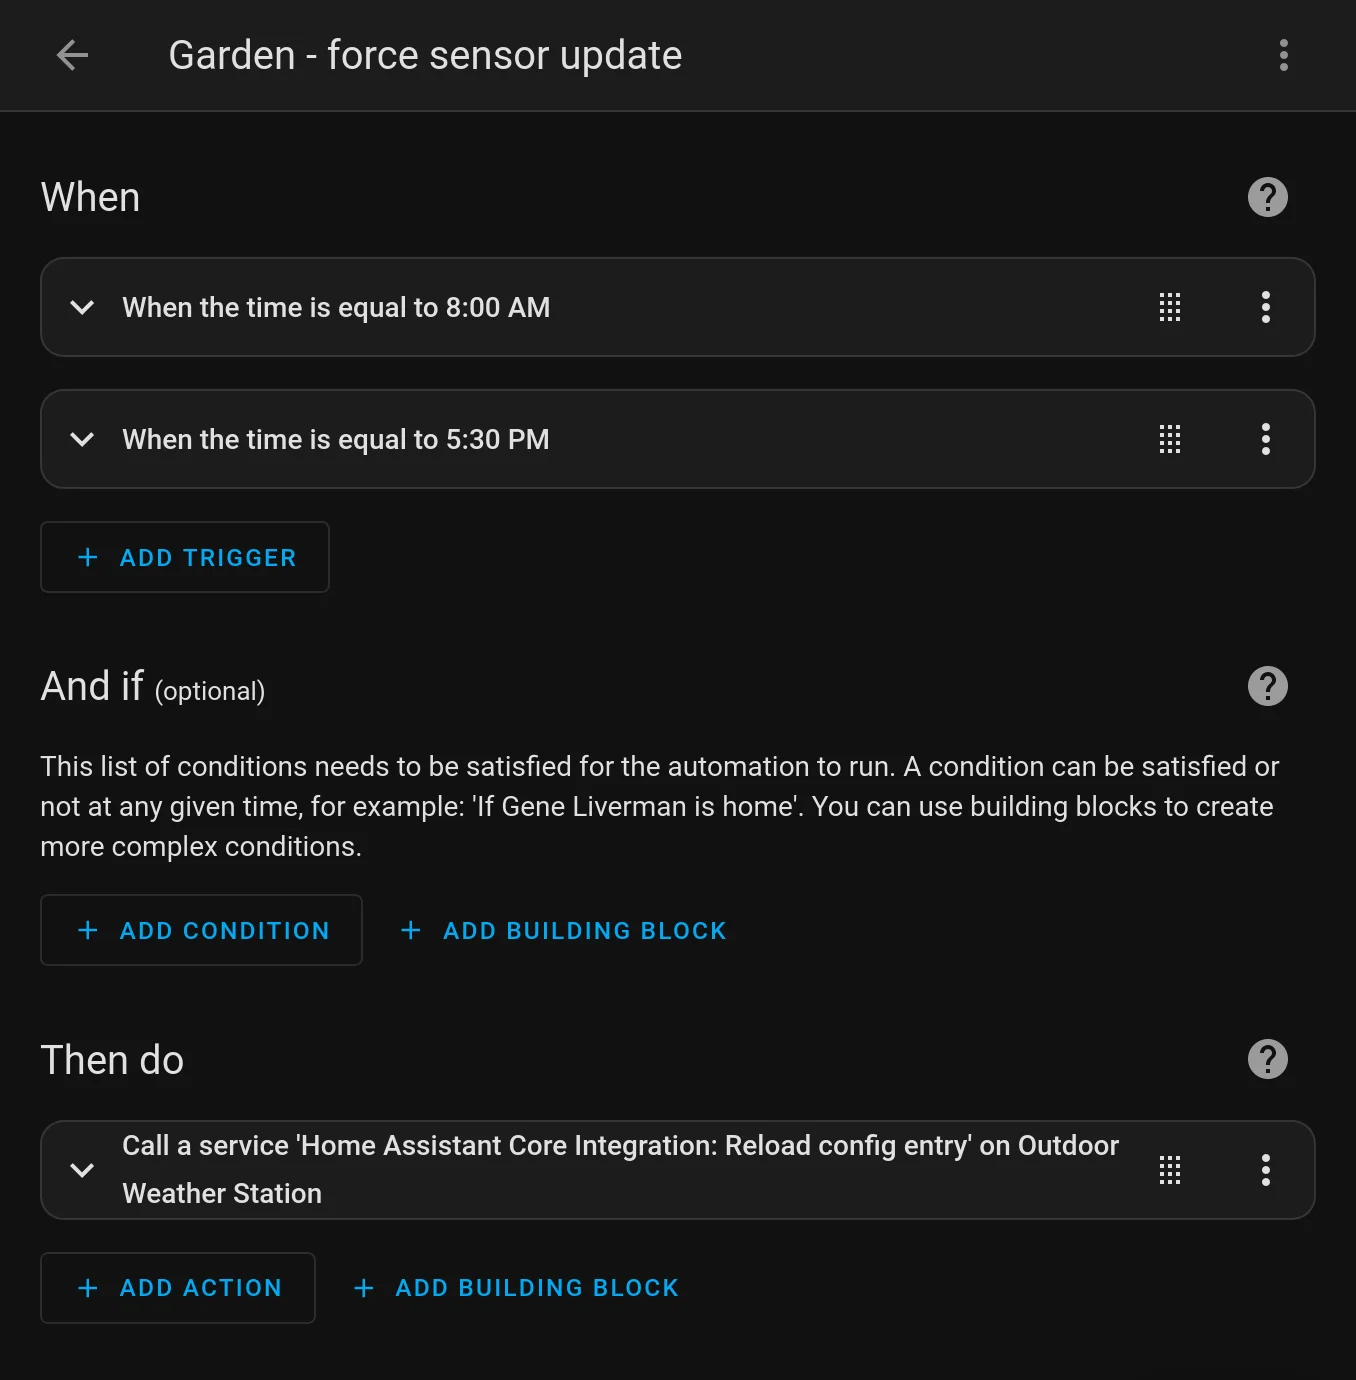
I set the triggers for this automation to be the same as the beginning of the two time windows in the conditions of the other automation.
Is it going to rain?
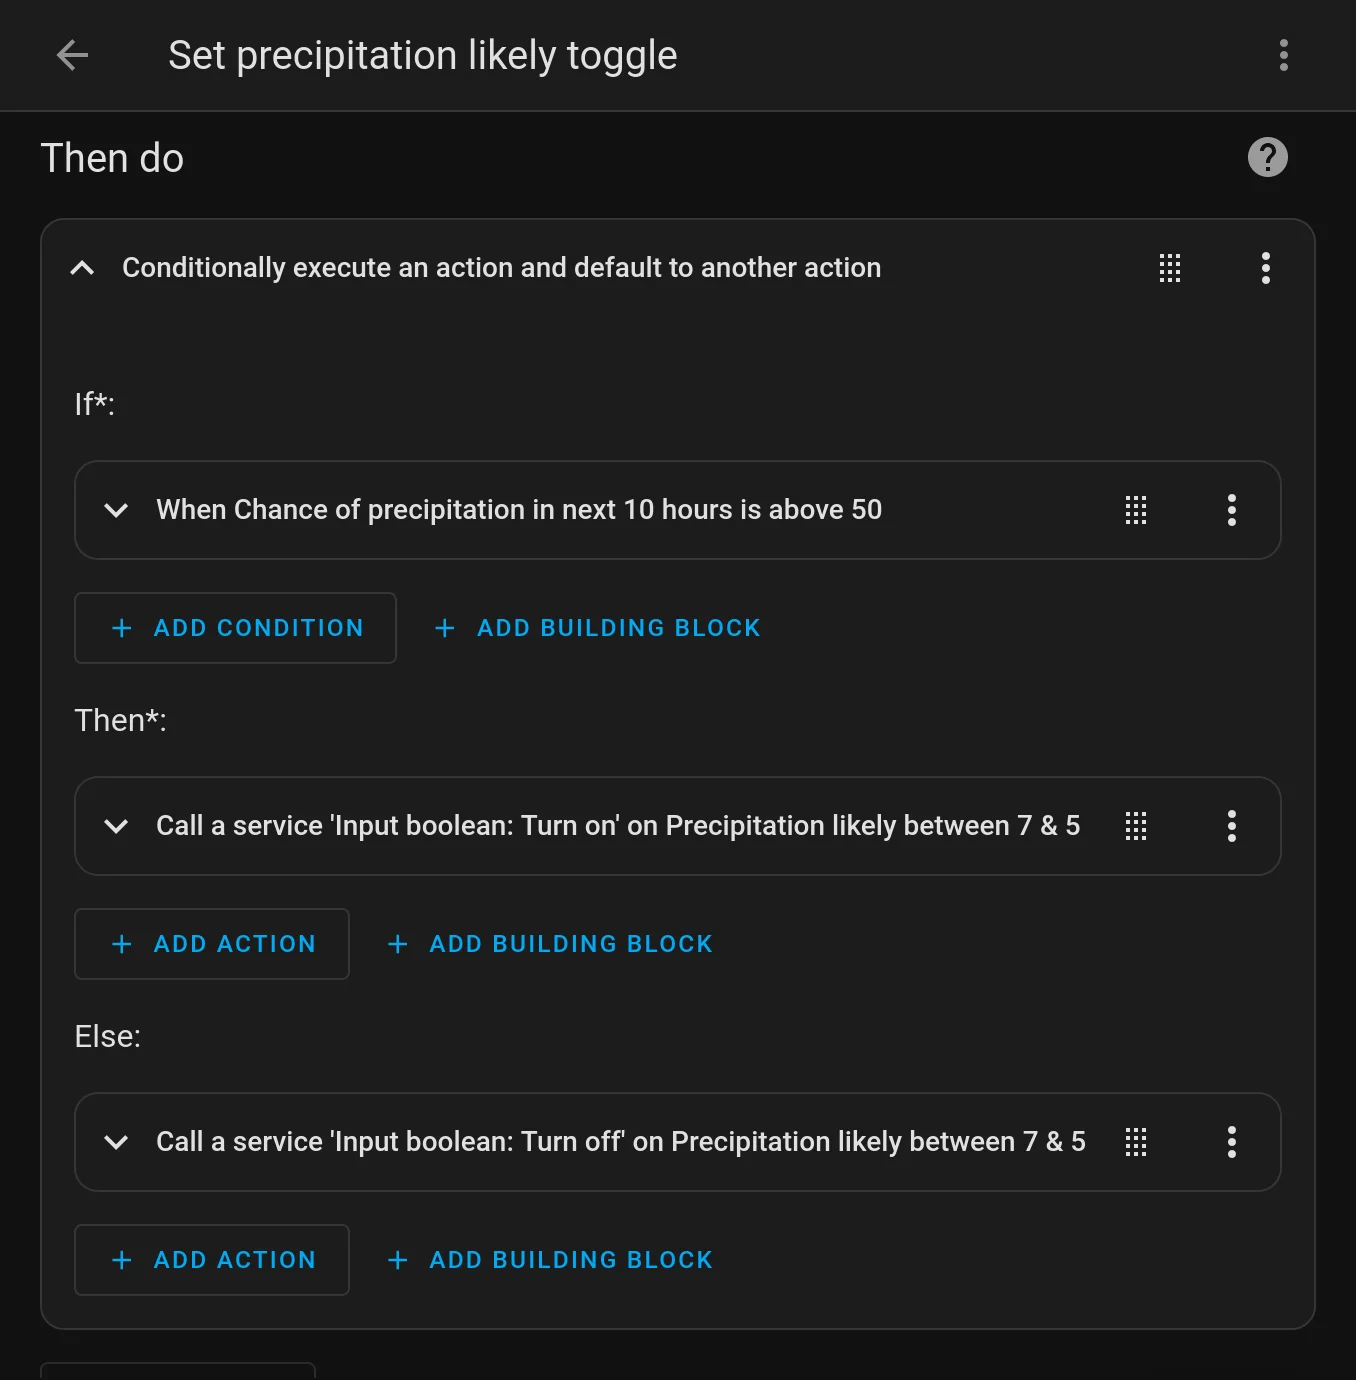
When going through the conditions in the first automation, I mentioned having a helper to tell me if it is going to rain. What I have created for this is a pair of “Helpers” in Home Assistant.
The first is a template sensor that gets the hourly forecast for the next 10 hours and records the max percentage chance of precipitation.
The second is a toggle, aka input boolean, that I set via an automation that runs at 7:01am each morning (just after the start of the hour before my first watering time window):
The 10 hour range mentioned just above covers the 7am hour through the 4pm hour. This means the toggle is set before the time window opens and looks ahead until just before the second time window.
Code
The code for all of this is too much to include in a blog post, so I’ve posted it all to GitHub at github.com/genebean/home-assistant-examples/tree/main/automated-plant-watering
Do be sure to see the update above where I converted most of this into a blueprint.
Closing
This has been exciting to setup! I am really looking forward to seeing how it works this year, and maybe expanding the setup to cover a few more areas. One idea I have for the future is to use one of these timers on a rain barrel for some plants that are a little farther from my house… if that happens I’ll try to remember to post about it too.

 Nostr
Nostr